Payhip Review 2021: Perfect Platform To Sell digital Products
Selling digital products like e-books, videos, audio & music, or any other digital files can be a great way to monetize your blog, website or social media channels. When it comes to selling digital goods online there are plenty of e-commerce platforms that are available for you to choose from.
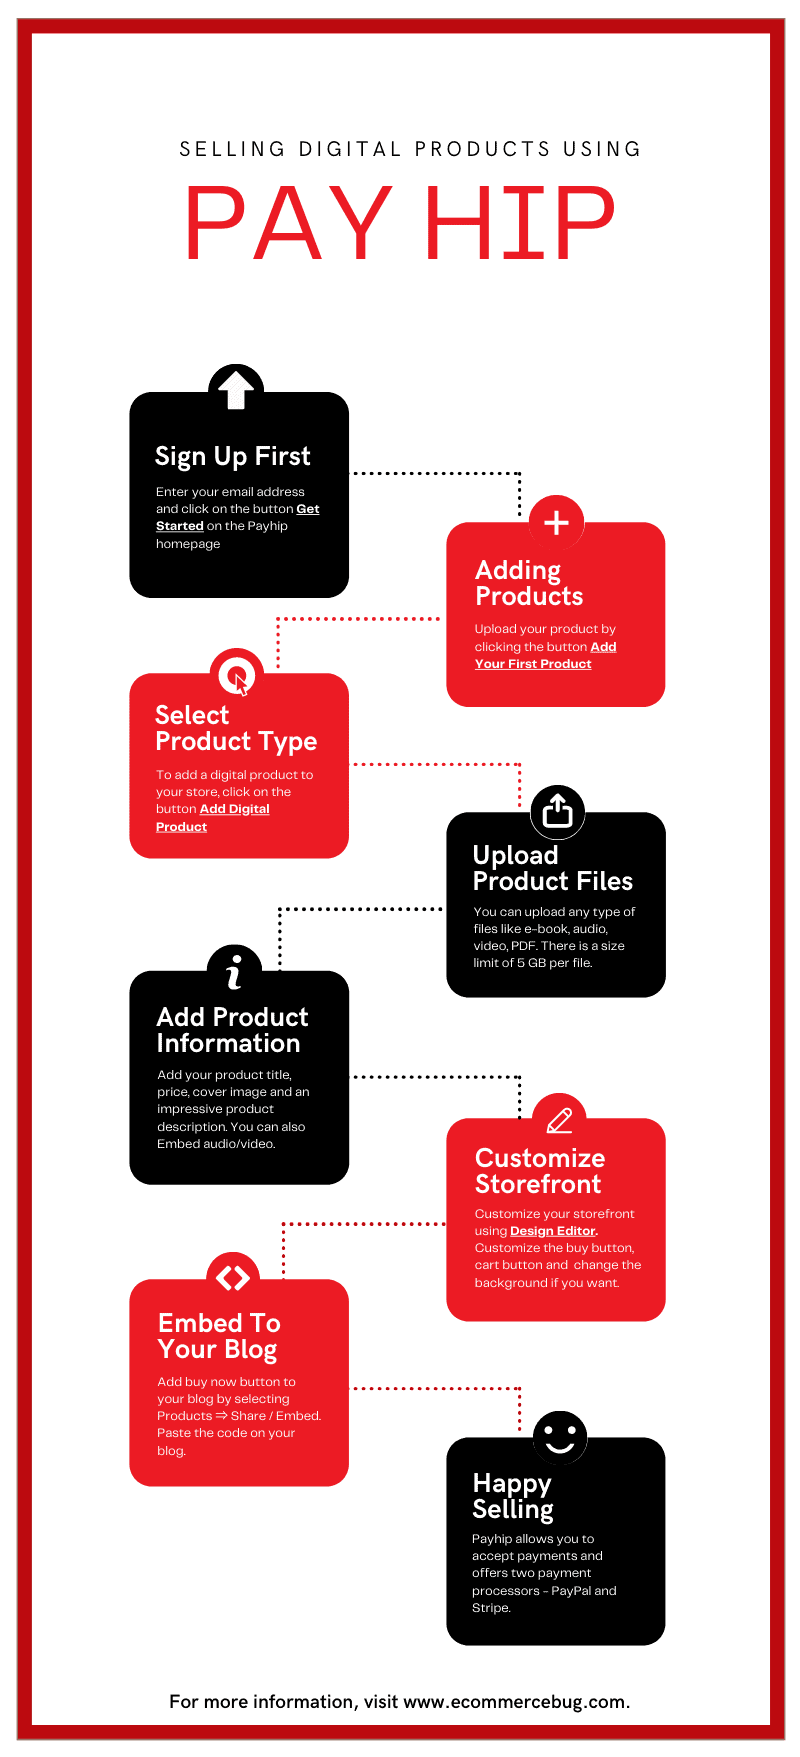
There are plenty of e-commerce platforms available that are focused exclusively on selling digital products. One of them are Payhip, which is a simple and affordable solution for promoting and selling digital products. As like any other e-commerce platform, Payhip also has its advantages and limitations.
In this Payhip review, you’ll find everything to start selling your digital products, its features, pricing plans, its pros and cons to help you decide, is Payhip the right eCommerce platform for your business.
Contents
Payhip Review : Overview
Payhip is a hosted e-commerce platform to promote and sell digital products. You can use Payhip to sell digital products like e-books, videos, audio & music, software files etc. You can easily set up your personalized storefront and showcase your products and allow your customers to buy and download your products.
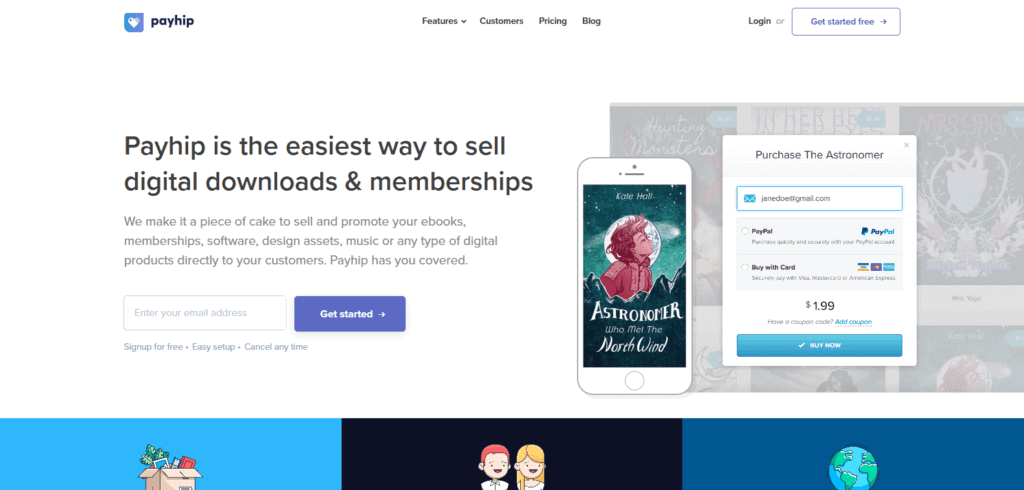
You can also sell physical products on Payhip platform along with membership subscriptions- to accept recurring payments. You can sell on your existing website or social media platforms by simply embedding your products and adding buy buttons on your website as well as on Facebook and YouTube.
Payhip was founded by London, UK based engineer and designer Abs Farah and Kahin Farah in 2011. Payhip is one of the easiest platform to sell digital downloads and memberships. It provides all you need to set up and manage your business from setting up a suitable store, uploading and managing your files, to marketing, promoting, and selling them.
Payhip Review: Features
Payhip is used by over 130,000+ sellers across the world and comes with lots of features to help you sell digital downloads as well as memberships.
Ease Of use
Payhip is easy to use and to get started all you need to enter your email address and click on the button Get Started on the homepage. After that, you will be prompted to choose a password for your account.
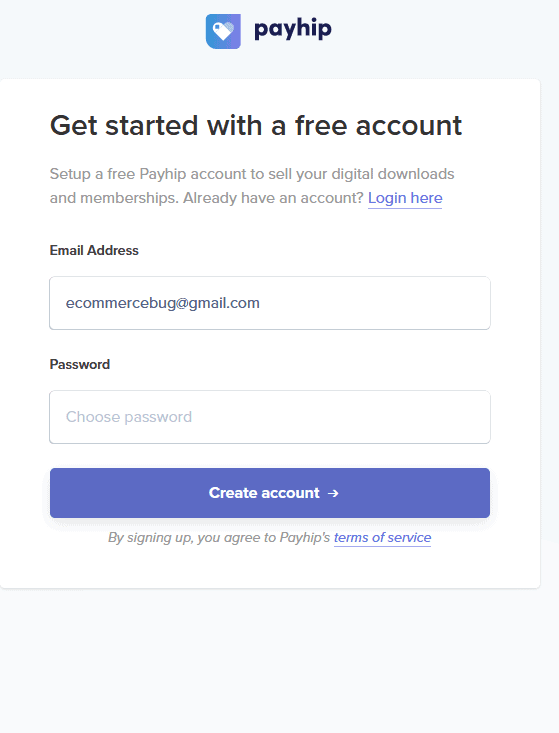
After you create your Payhip account, you will be directed to your dashboard. Payhip dashboard allows you to add products, customize your store, manage payment methods, define coupons and affiliate programs for your Payhip store, and so on.
Adding your products in Payhip is super easy and all you have to do is to add your product title, upload product image, product file and add the description of your product. After adding your products, you can start selling from the hosted storefront or social media and your websites by simply placing Payhip’s checkout button (or cart) on your preferred sales channel.
Payhip supports PayPal, Stripe payments and all other major cards for payment processing. You can also create a multi-currency storefront using Payhip and also handles your EU VAT calculations on its own.
Setting Up Products
After you have logged in, you can easily upload your product by clicking the button Add Your First Product. You can add several types of products in Payhip store:
- Digital Products – You can sell any type of digital products on Payhip that can be uploaded in a downloadable file format. Some example of digital products sold on Payhip are e-books, magazines, tutorials, films, animations, fonts, wallpapers, 3D models, apps, games, and subscription-based products (i.e. fitness plans) etc.
- Subscriptions – Payhip also allows you to sell subscriptions to your customers. Subscriptions are regularly delivered products with recurring payments for example, weekly meal plans, magazine subscriptions, courses and tutorials and software licensing etc. Selling subscriptions are easy with Payhip you simply pick a time interval for the delivery of the product and update the file. Then Payhip will automatically collect the payments on defined interval for you and delivers an email to the customer with their new download links.
- Physical Products – Now you can also sell physical products on Payhip. You can also add product variations like color, size etc to your products. Please note: Payhip does not provide shipping or fulfillment services to your physical products, so only you will have to handle products shipping and fulfillment.
Payhip has very easy to use and simple product management system and interface is pretty straightforward to upload your products. Payhip allows you to upload unlimited numbers of products in your store and there is no limit on the storage also. However they recommend that individual files must be less than 5GB in size.
Since Payhip is mainly for selling digital products it doesn’t offer as many features as other eCommerce platforms offers like Shopify, WooCommerce etc like inventory management, order management etc.
To add a new products navigate to Product page in your dashboard and click on the button Add Product. It will prompt you to select the type of product you want to add:
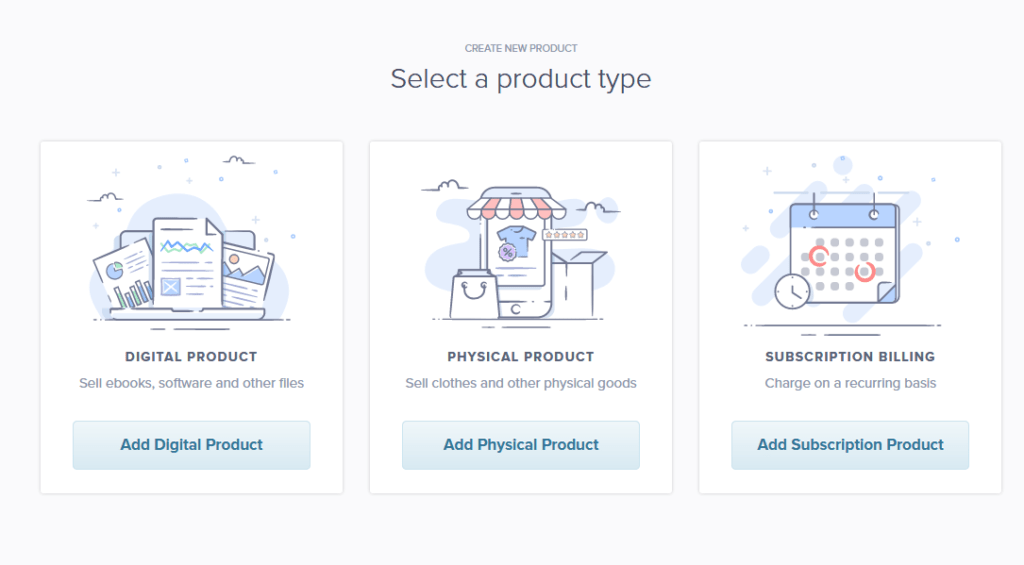
Selling Digital Products with Payhip
To add a digital product to your store, click on the button Add Digital Product while selecting the type of product you want to add. You will see a number of fields on the next page as shown below:
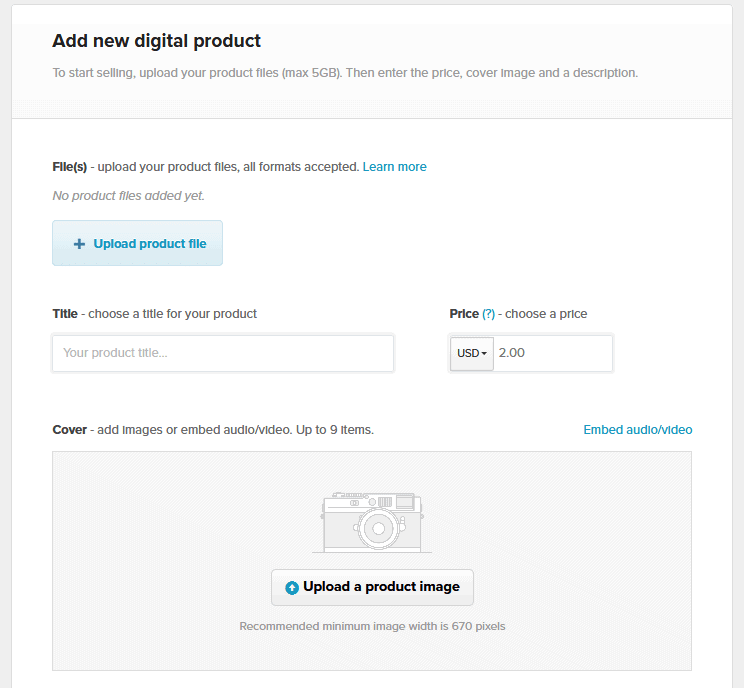
You will need to upload the product files first, and you can upload any type of files like e-book, audio, video, PDF. You can also upload multiple files here but remember there is a size limit of 5 GB per file for files uploaded here.
Next you need to add your product title and price of the product. Payhip also lets you set pay-as-you-wish price for your product. To let your customers choose their own price you can type 0+ in the Price field. To set a minimum price for your product you can type 2+, 5+ or 10+ etc in the Price field.
Next you need to add a cover image for your product, it is advised to add a refined product image and an impressive product description. You can even use audio or video files by clicking on Embed audio/video and pasting in a link to YouTube, Vimeo, or SoundCloud.
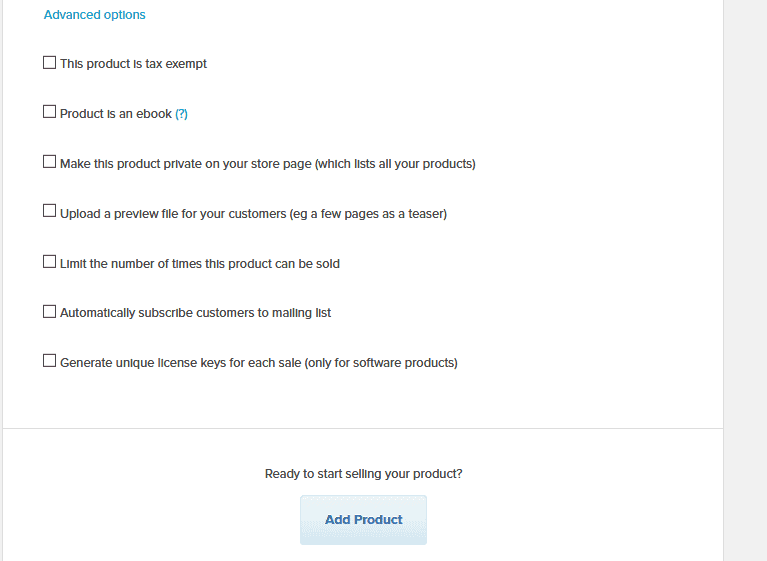
Payhip also allows you to set various advanced options for your digital product listing like mark the product as an e-book, tax-exempt the product, limit number of products to be sold etc. You can set the advanced option by clicking Advanced Options and selecting the appropriate field.
Selling Physical Products with Payhip
To add a digital product to your store, click on the button Add Physical Product while selecting the type of product you want to add. You will see a number of fields on the next page as shown below:
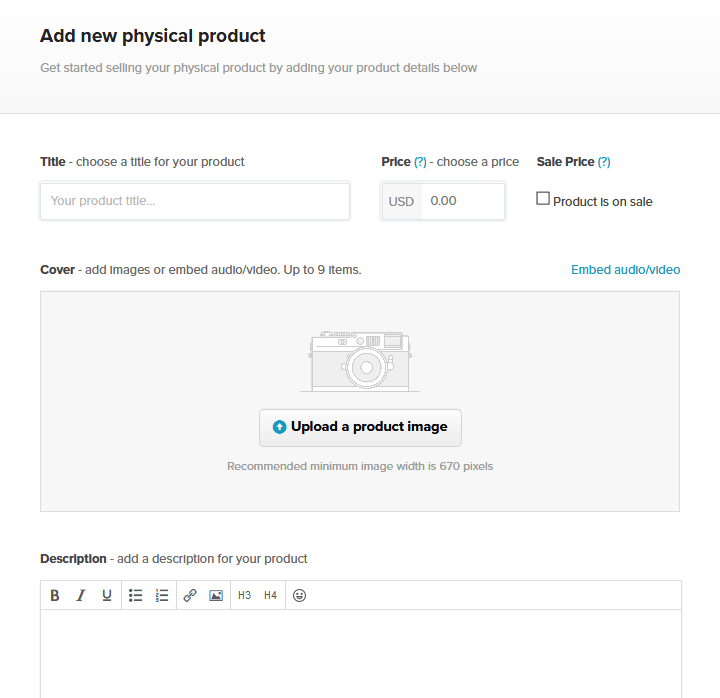
In physical products you don’t need to upload any product files, but you need to add your product title and price of the product. You can also mark a product on sale. To mark a product on sale check the checkbox Product is on sale and then choose the sale price.
Next you need to add a cover image and product description for your product. You can also add audio or video files as in the case of digital products. Your product description should clearly define all the benefits of the product, as it is the last thing the customer sees before making the purchasing decision.
Under additional details, you can also add a SKU for your product and set up inventory tracking by selecting the checkbox Track product inventory. Enter the number of the products that you currently have and, every time a sale is made that will be subtracted from this number.
You can also add a product weight, used to calculate the shipping price based on the shipping rate for the weight and the customer’s location as added under Settings > Shipping.
You can also add variations (e.g. different colors or sizes) to a product by clicking This product has different variations.
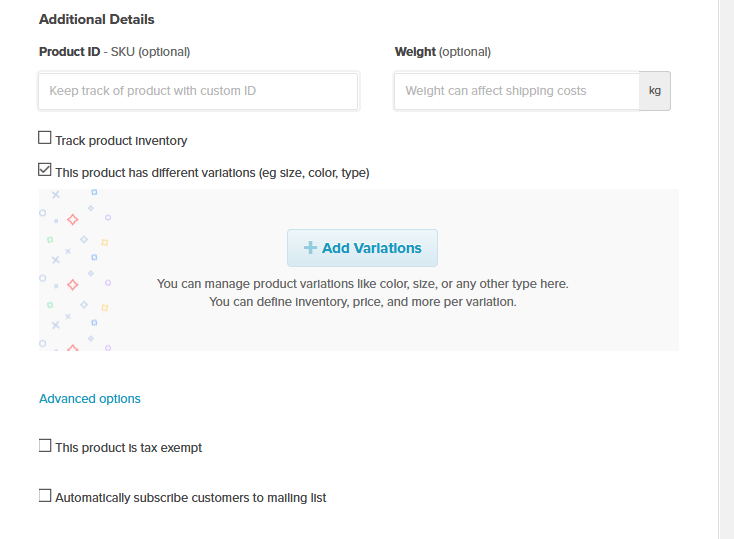
This will bring up a popup window where you can enter the details of the variations. There are also a couple of advanced options that you can set by clicking Advanced Options and selecting the appropriate field.
Selling Subscription Products with Payhip
To add a subscription product to your store, click on the button Add Subscription Product while selecting the type of product you want to add. You will see a number of fields on the next page as shown below:
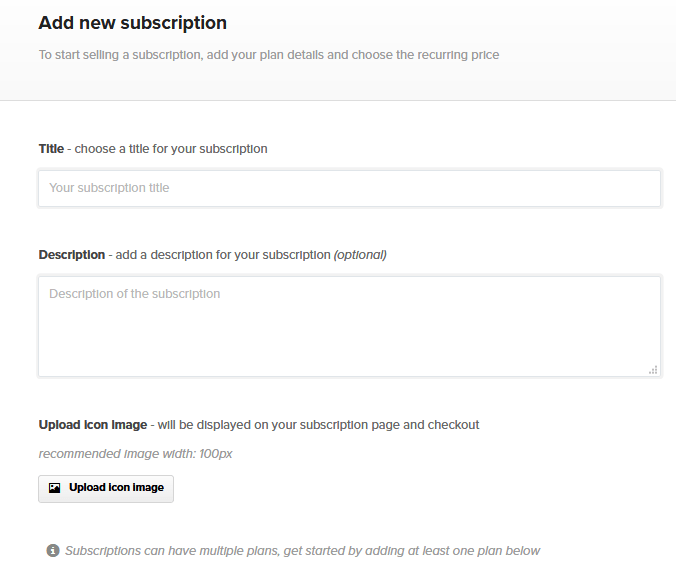
First you will need to choose the Title and Description of the product. You can also upload an icon image, that will be displayed on the customer’s subscription page and at checkout. Next you need to add the subscription plan, i.e. the reccuring payment plan for the customers. Just scroll below to the plan section.
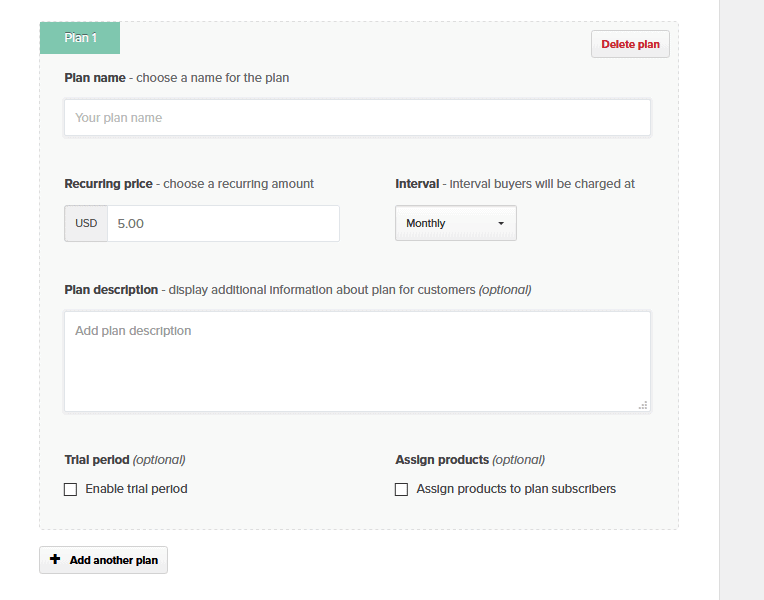
For the plan you need to enter the Plan name and choose Recurring price i.e. the amount that subscribers will be charged on a recurring basis. Next you need to select the Interval, how often subscribers will be charged. This can be either monthly, every 3 months, every 6 months, yearly, or a custom period of time. Please note that a custom interval cannot exceed 1 year.
Next you need to provide Plan description. You can also add a free trial period to your subscription, that means the customers won’t be charged for the first time until X number of days after subscribing. You can also give access to any digital products to the customers subscribing to your plan from the field Assign products.
After you have entered all the information, click the button Add Subscription to save the plan or if you want you can also add another plan by clicking the button Add another plan. You can check the box Collect shipping address, if you’re including physical products with the subscription that you’ll need to send to the customer.
There are also a few advanced options that you can set by clicking Advanced Options and selecting the appropriate field.
Customization
Payhip provide a simple storefront to list all your products, if you are not happy with its look it also allows you to customize it using Design editor. You can access the design editor under the Account menu.
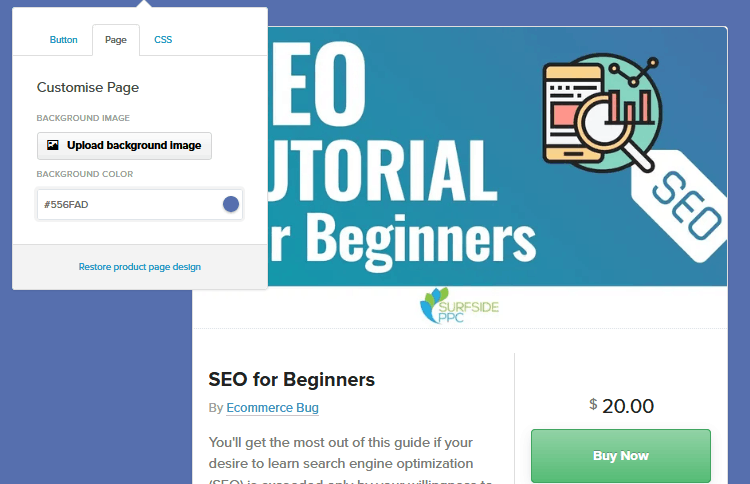
The design editor allows you to customize the buy button and cart button as well as changing the background of your product page. You can also add custom CSS to customize the look of your product page.
By Default, after your customer purchases a product they will be directed to the download page where they can download the purchased products. If you want, Payhip also allows you to redirect your customers to a different page like our own custom thank you or checkout success page, after the checkout process.
To set up a checkout redirect, navigate to Account > Settings > Advanced Settings in admin dashboard and scroll down to Checkout Settings and select the checkbox Redirect customers to a particular webpage when they successfully complete the checkout. This will bring up the option to Add success redirect, click on the button to set up checkout redirect.
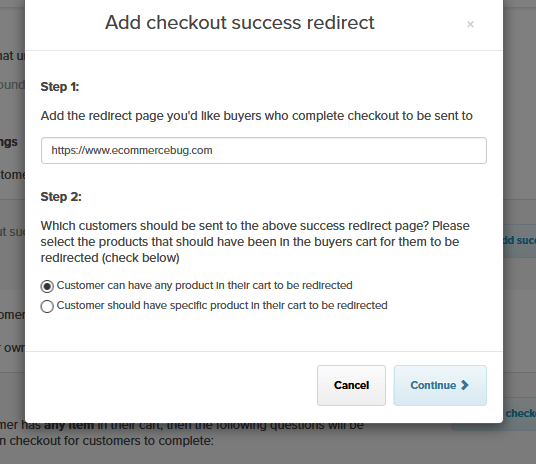
Enter the URL for the webpage that you’d like customers to redirect to after checkout and choose whether this redirect should be applied to all of your products, or just a specific one.
Payhip also allows you to add custom questions to your customer while checkout for example you can tell your customers to add your terms and conditions or any other question before checkout.
To set up a custom checkout questions, navigate to Account > Settings > Advanced Settings in admin dashboard and scroll down to Checkout Settings and select the checkbox Display your own questions for customers to answer during checkout. This will bring up the option to Add checkout questions click on the button to set up checkout redirect.
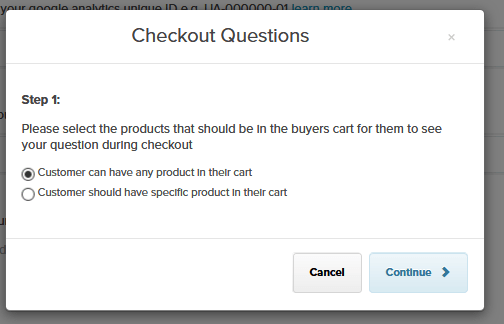
In step1 you can select if the custom questions should be displayed for all products or for any specific product only. Select your desired choice and click the button Continue.
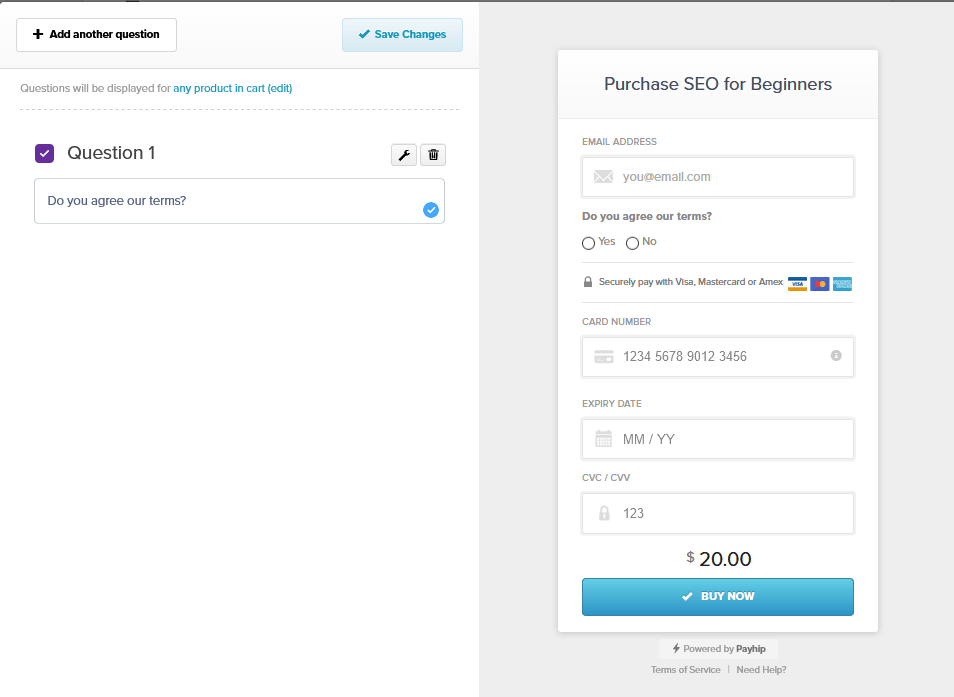
The next screen will show you the options to add your own custom questions. You can add a question by clicking the button Add another question and entering the information as required. You can also make a question mandatory by selection the setting icon next to a particular question and selecting the box Required.
Marketing
Payhip provides various marketing features to enable you to increase your sales and earn more. You can run promotions for your products by offering a discount to clients by offering a coupon codes. To create a coupon code, click on Marketing in the top menu, and it will land you on the Social page. To create a coupon, click on the button Add Coupon Code, it will open a model window as shown below:
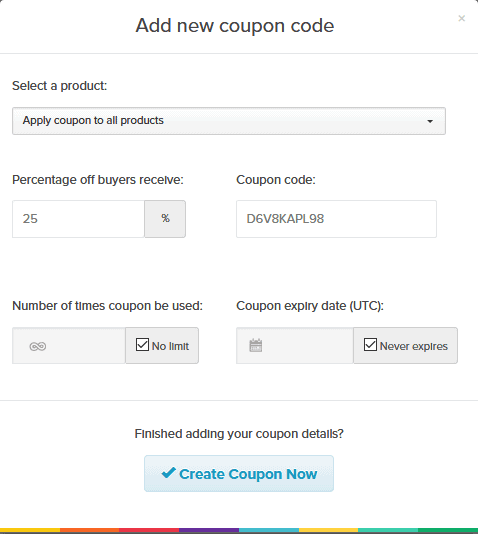
You can add coupon for a particular product or for all products in your store. Select your desired choice from the drop-down Select a product, choose the percentage off the price that you’d like to give to customers with this coupon code. A coupon code will be generated automatically, but if you’d like to choose a code that is more specific to your promotion, you can update the Coupon code field.
You can limit the number of time the coupon can be used and the date when the coupon will be expired. To set these options uncheck the box for Number of times coupon can be used and Coupon expiry date respectively and select the appropriate value.
Payhip also allows you to add social discounts, which allow you to incentivize people to share your product on Facebook by offering them a discount on the price of the product if they do. To create social discounts, navigate to Marketing > Social Discounts in the top menu, and, click on the button Add Social Discount, it will open a model window as shown below:
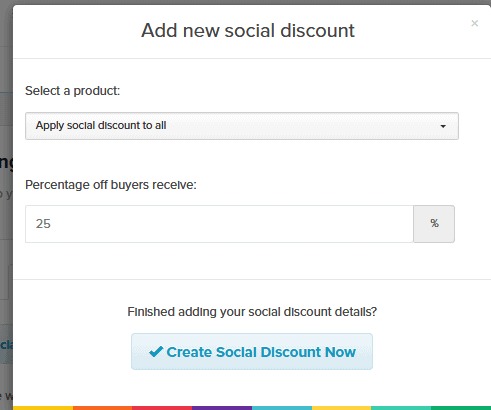
You can add social discounts for a particular product or for all products in your store. Select your desired choice from the drop-down Select a product, choose the percentage off the price that you’d like to give to customers to have if they share your product on Facebook. Once you’re finished, simply click on the button Create Social Discount and your social discount will be created.
Apart from this Payhip also provides you other marketing features like referral systems, mailing lists, cross-selling and upgrade discount etc. You can also add Facebook ad pixels to create ads for your store and track their performance.
Embed Options
Apart from giving you the option to setup store through their platform, Payhip also offers you several embed options to increase your products visibility and boost your sales. You can easily add buy now button for any product on your existing website and turn your existing pages into a store. To embed a button linking to a product on your Payhip store, click on the menu link Products at the top of your admin dashboard. Find the product that you’d like the button to link to, select Share / Embed, and then go to the Embed Button tab of the modal that appears.
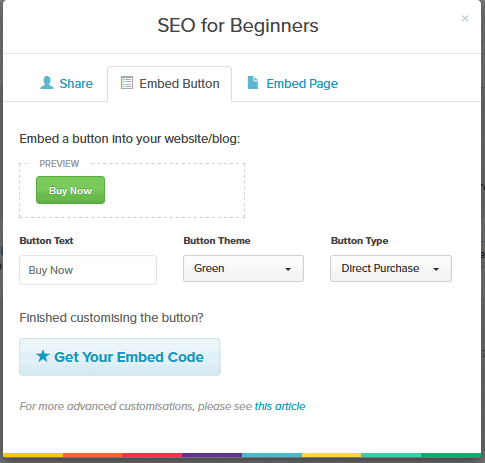
Here you can customize the Button Text as well as Button Theme to match as per your blog or website. There are two types of button that you can create – Direct purchase, where customers will direct the user straight to check out for the product and Add to Cart, where product will be added to the user’s cart and customer’s can add more products before making purchase.
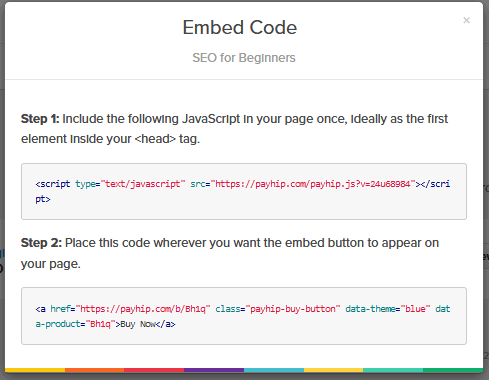
Once you are done customizing your button, click Get Your Embed Code. This will give you two snippets of code. Paste the first one within the <head> tag of the page and paste the second one wherever you want the button to appear on your page.
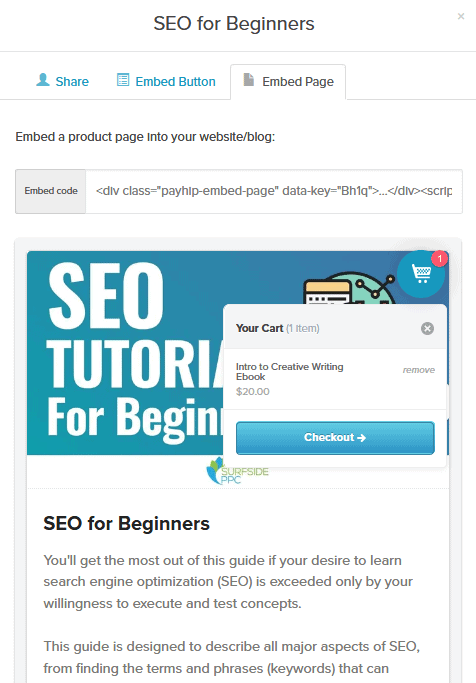
Similarly, you can also embed the whole product page in your website by going to the Embed Page tab of the modal that appears after clicking the button Share / Embed and pasting the given code into your website’s code in the location where you want the page to appear.
Payments and Security
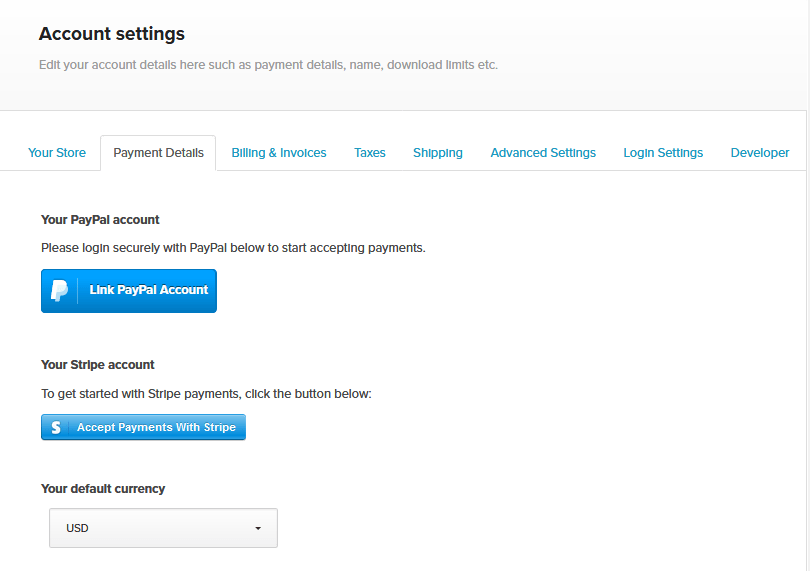
Payhip allows you to accept payments directly from your store and offers two payment processors on their platform, PayPal and Stripe. You can use PayPal to accept payments from customers in more than 200 countries and also offer a credit card payment option on your store with Stripe.
Payhip also allows you to protect your PDF files from piracy. PDF Stamping will automatically add buyer’s email addresses to every page of your PDF product file so that each customer gets a uniquely marked file. You can even limit the number of times each customer can download your products. Payhip also provide instant payouts, multiple currencies, global taxes and currencies, EU VAT reports and customer invoices.
Analytics and Reporting
Payhip has excellent analytics and reporting tools where you can check from where your traffic is coming, what’s your best-selling products and many more. On the Analytics page of your admin dashboard you’re able to see your conversion rate. This is the people who’ve visited your Payhip site, what percentage of them have gone on to start and/or complete checkout.

On the Analytics page of your admin dashboard you can track the sources of traffic to your Payhip site like Direct, Google, Bing, Facebook, Pinterest. You can also track your sales and views using a couple of handy graphs.
Payhip Review: Integrations
Payhip allows you several integrations to expand the functionality and help you automate your e-commerce store. You can set up Google Analytics tracking to your store and check your store metrics including e-commerce data. You can add Facebook pixels to your store to track your store visitors, their actions and successfully run Facebook ads.
You can also connect to various email-marketing applications to add buyers to an email marketing campaign or to segment buyers and add them to different forms depending on which product they buy. To set up a mailing list, navigate to Marketing > Mailing Lists in the top menu, and, click on the button Setup Mailing Lists, it will open a model window as shown below:
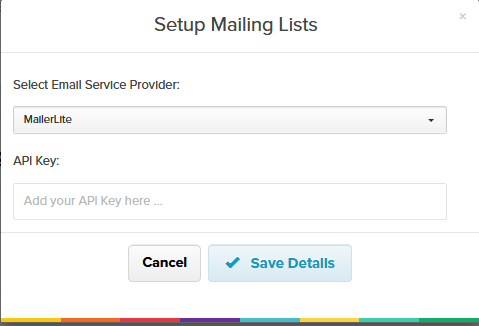
Select your favorite email provider from the drop-down and enter the API key to set up the mailing list and add subscribers to your email list. Payhip also allows you to connect to Zapier, which gives you the ability to integrate with over 2000 different third-party apps, including tools like MailerLite, Trello, Salesforce, and more. To know more how to connect Zapier to Payhip, watch the video tutorial below:
Payhip Review: Pricing
Payhip offers three pricing plans starts at $0 /Month. All plan comes with all features like unlimited products, store customization, discount codes etc.
The three pricing plan are as follows:
- Free Forever – $0 per month. +5% transaction fee, all Features, unlimited products
- Plus– $29 per month, +2% transaction fee, all Features, unlimited products
- Pro – $99 per month, No transaction fee, all Features, unlimited products
The basic difference between all plans are the transaction fees Payhip charges for per sale. Please note – PayPal and Stripe will still charge at their standard rates once they complete a transaction. This applies for all plans.
Payhip Review: Support
Payhip provides extensive relevant articles and guides for all its features, you can view it on their support page. Payhip provides basic support via email on contact@payhip.com or via their Twitter account.
Payhip Review: Pros & Cons
Some pros of Payhip platform are as follows:
- Payhip offers a free plan so that you can run your online shop on Payhip without paying any monthly subscription fees.
- Payhip provides instant payment. You will receive all your payments right after a successful transaction.
- Payhip supports both PayPal and Stripe payment processors.
- You can sell digital products, physical goods, and subscriptions from your Payhip store.
- Payhip provides various out-of-the-box functionalities like upsell, cross-sell, and promote your products.
- Payhip integrates with Google Analytics, Facebook Pixel, and Zapier etc.
- You can embed your online store in third-party platforms.
- You can also sell products without your own website.
- Payhip accommodates an unlimited number of products.
- The platform is ideal for selling digital items and membership subscriptions.
Some cons of Payhip platform are as follows:
- The number of app integrations is very limited.
- Payhip doesn’t allow you to connect a custom domain.
- Your website customization capabilities are extremely restricted.
- Payhip’s affiliate program is limited in features.
Payhip Review: Alternatives
Payhip is a great platform for selling digital products for designers and professionals, but there are some platforms also that are as good as Payhip. Let’s have a look at some of them:
- Gumroad – Gumroad is an excellent tool for selling digital products for independent writers, designers, game developers, musicians, artists, filmmakers etc. It is an easy-to-use shopping cart that allows you to get started selling your products immediately. It has some great features and charges you a percentage of the transaction which makes it great for low volume, but not ideal for professional sellers.
- SendOwl – SendOwl is one of the best Payhip alternatives that you can consider selling your digital products, membership and also subscriptions. SendOwl comes with the 1-click upsells, shopping cart and services selling feature. SendOwl supports more payment options than Payhip such as credit card, PayPal, Apple Pay, and Bitcoin.
- Selz – Selz is an e-commerce platform to sell both digital and physical products to your customers. You can use Selz to create an online store by using their theme and customize it using their drag and drop builder. Selz also gives you the ability to add your own custom domain, embed buy buttons, products, or whole store on your business website, as well as integrate your store with Facebook. For physical products, Selz also offers inventory management and shipping services.
Payhip Review: Conclusion
Based on our Payhip review, this platform is best suited for designers and professionals who are intended to sell their digital products and membership subscriptions. If you intend to sell physical products, then you should look for other alternative products as Payhip has not great features to sell physical products as some of other platforms has like Shopify or BigCommerce.


![Canva vs Adobe Spark - Which is better Online Graphic tool in [year]? Canva Vs Adobe Spark](https://www.ecommercebug.com/wp-content/uploads/2021/11/Canva-Vs-Adobe-Spark-1-300x169.jpg)
